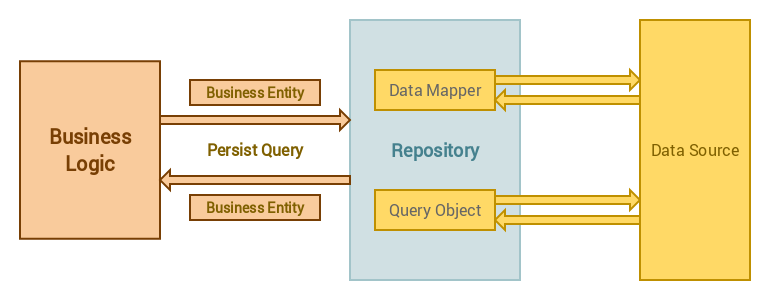
The Repository Pattern in Laravel is a design pattern that provides an abstraction layer between your application’s business logic and the data access code. It helps in organizing and centralizing data access logic, making your code more maintainable and testable. Here’s a step-by-step guide on how to create a basic repository pattern in Laravel:
Step 1: Create a Repository Interface
Create an interface for your repository in the App\Repositories directory. This interface will define the methods that your repositories should implement:
// App\Repositories\RepositoryInterface.php

namespace App\Repositories;

interface RepositoryInterface
{
    public function all();

    public function find($id);

    public function create(array $data);

    public function update($id, array $data);

    public function delete($id);
}
Step 2: Create a Base Repository Class
Create a base repository class that implements the RepositoryInterface. This class will contain common methods that are shared across all repositories:
// App\Repositories\BaseRepository.php

namespace App\Repositories;

use Illuminate\Database\Eloquent\Model;

class BaseRepository implements RepositoryInterface
{
    protected $model;

    public function __construct(Model $model)
    {
        $this->model = $model;
    }

    public function all()
    {
        return $this->model->all();
    }

    public function find($id)
    {
        return $this->model->find($id);
    }

    public function create(array $data)
    {
        return $this->model->create($data);
    }

    public function update($id, array $data)
    {
        $record = $this->model->find($id);
        return $record->update($data);
    }

    public function delete($id)
    {
        return $this->model->destroy($id);
    }
}
Step 3: Create Specific Repositories
Now, you can create specific repositories for each model in your App\Repositories directory. These repositories should extend the BaseRepository and provide any additional methods specific to the model:
// App\Repositories\UserRepository.php

namespace App\Repositories;

use App\Models\User;

class UserRepository extends BaseRepository
{
    public function __construct(User $user)
    {
        parent::__construct($user);
    }

    // Additional methods specific to the User model can be defined here
}
Step 4: Bind Interfaces to Implementations
In your App\Providers\AppServiceProvider or a dedicated service provider, bind your interfaces to their respective implementations in the register method:
// App\Providers\AppServiceProvider.php

namespace App\Providers;

use Illuminate\Support\ServiceProvider;
use App\Repositories\RepositoryInterface;
use App\Repositories\BaseRepository;

class AppServiceProvider extends ServiceProvider
{
    public function register()
    {
        $this->app->bind(RepositoryInterface::class, BaseRepository::class);
        // Bind specific repositories
        $this->app->bind(UserRepository::class, function ($app) {
            return new UserRepository(new User());
        });
        // Add other repository bindings as needed
    }
}
Step 5: Use Repositories in Your Controllers or Services
Now, you can use your repositories in your controllers or services. Inject the repository through the constructor, and Laravel’s service container will automatically resolve the appropriate instance:
// App\Http\Controllers\UserController.php

namespace App\Http\Controllers;

use App\Repositories\UserRepository;

class UserController extends Controller
{
    protected $userRepository;

    public function __construct(UserRepository $userRepository)
    {
        $this->userRepository = $userRepository;
    }

    public function index()
    {
        $users = $this->userRepository->all();
        return view('users.index', compact('users'));
    }

    // Other controller methods using the UserRepository
}
By following these steps, you’ve implemented a basic repository pattern in Laravel, which can help in better organizing and testing your data access code.


[…] You can also use : Repository Pattern […]